First of all: Yes, this blog post is backdated. I'm doing this to keep things tidy on my blog.
Guess what's available at Smashwords? That's right, Basic Fiction Formatting for Smashwords in OpenOffice is now available as a download there. If you don't have a Smashwords account, you can download the PDF here from my Google Docs account. Like any good reference material, I'm sure it will be revised as I learn new things about formatting and OpenOffice and as I experiment with my own order of doing things, but right now, I'm just glad it's finally available.

Showing posts with label formatting for smashwords in open office. Show all posts
Showing posts with label formatting for smashwords in open office. Show all posts
Saturday, June 9, 2012


Monday, May 28, 2012
Monday Miscellany: A Program, Fandom, and Work
Last week, Paperback Writer posted about Sketchup (which you can get here). I haven't really made anything with it yet, but I have played around in it, and I think once you get past the learning curve that it could be really, really useful. Probably the first "big" project I'll use it for will be to lay out the Vue de la Mer Inn, the main setting in The Guest. The free version is probably all you need if you're just going to be creating mockups for yourself/reference.
As I mentioned over the weekend, fandom has kind of taken over my free time lately. Despite the fact that I haven't gotten any "work" done, I can't complain. The thing about fandom is that it inspires creativity. It reminds you why you do what you do and what you really love and, at least for me, it helps push me back in the right direction. I remember to read the right things, watch the right things, and write the right things. If you've never thrown yourself whole-heartedly into a fandom, I recommend it.
This week here on the blog should be sort of a mish-mash. Tomorrow I have a nine things post for you and, since I really dropped the ball on reporting my book sales, you can expect two sales posts. According to my stats, a couple of regular visitors come looking for sales data, and even though my sales have been really low, transparency and help are two of the goals of this blog.
With any luck, I'll also be able to assemble the Smashwords formatting guide for OpenOffice and figure out how to offer it. Don't worry--like the official Style Guide, it'll be free.
As I mentioned over the weekend, fandom has kind of taken over my free time lately. Despite the fact that I haven't gotten any "work" done, I can't complain. The thing about fandom is that it inspires creativity. It reminds you why you do what you do and what you really love and, at least for me, it helps push me back in the right direction. I remember to read the right things, watch the right things, and write the right things. If you've never thrown yourself whole-heartedly into a fandom, I recommend it.
This week here on the blog should be sort of a mish-mash. Tomorrow I have a nine things post for you and, since I really dropped the ball on reporting my book sales, you can expect two sales posts. According to my stats, a couple of regular visitors come looking for sales data, and even though my sales have been really low, transparency and help are two of the goals of this blog.
With any luck, I'll also be able to assemble the Smashwords formatting guide for OpenOffice and figure out how to offer it. Don't worry--like the official Style Guide, it'll be free.
Friday, May 25, 2012
Self-Publishing: Basic Fiction Formatting for Smashwords in OpenOffice: Companion Post with Links to Templates
According to my blog stats, a few people have visited looking for a copyright page template and a Smashwords-ready document template. So here you go. That's a fully-downloadable Google doc without any of the formatting (detailed here, here, here, and here). All you have to do is change the details, insert your story, create your linked table of contents, and upload. Just verify that your formatting looks okay before you upload.
If you just want the copyright page template, you can get it for Smashwords here and for a non-Smashwords document here.
If you just want the copyright page template, you can get it for Smashwords here and for a non-Smashwords document here.
Wednesday, May 23, 2012
Self-Publishing: Basic Fiction Formatting for Smashwords in OpenOffice (Part 4: Steps 10 - 11)
You can read the first three parts here, here, and here. This post should complete the Smashwords series. Since it has been fairly well-received, expect to see one for Kindle Direct Publishing and one for AllRomance, too.
Today, we're going to create our "extra" pages (the summary, the table of contents, acknowledgements, about the author, and also by) and then create a linked table of contents. As always, I strongly suggest consulting the Smashwords Style Guide by Mark Coker and using this guide only as a program-specific supplement. Click on any photo to enlarge.
Step 10: Extras
Step 10a: Summary
In all of my books, I've included a summary first thing. I got the idea from someone on Twitter who lamented that she'd download free books and then forget what they're about when she got around to reading them. Not remembering what they were about meant she was less likely to read them. So I include a sort of "inside front flap" summary. You don't have to. If you choose not to, just skip this step.
In front of your copyright page, type up your summary, then do three carriage returns (no more).

Step 10b: Insert Manual Break
A manual page break won't affect the HTML or TXT files Smashwords creates, and it may not work on some devices, but I've always had excellent luck with this making the book look exactly as I want it to look. Even if the file doesn't break for a new page, the three carriage returns create space to separate the summary from the copyright page.

Step 10c: Table of Contents Page
After the summary page, you should have your title page and then your copyright page. For each of those, do the same thing: three carriage returns, insert page break. By this point, you should be on a fourth blank page. Here's where you create your table of contents. Give it a title (use the same style you used for your title page) and then add the contents list in default style. It should look something like this:

Step 10d: Acknowledgments, About the Author, Also by
These are all entirely optional pages, just as the Summary page is. If you'd like to keep your book super simple, just lead with the title and copyright pages, create a ToC that has only the story, and leave it at that. If, however, you'd like to give your thanks to those who helped you along, or your readers a chance to learn a bit about you and discover more, then this is the way to go. Marketing guides will tell you to add your website address (the full address; you can even try linking it, but I don't recommend it) and maybe even a sample of something else available for purchase.
At the end of your story, do the same as before: three carriage returns and insert manual break. This will be your acknowledgements page (or your About the Author, or Also by, or whatever it is.) Whatever you decide to do, be consistent in your formatting. If you have complete paragraphs, format the paragraphs with first line indent. If you're creating a list (of titles, for example) then leave them left-justified. Make sure you use the same header style as the other title headings in your book. This is what my "extra" pages look like:


Do this for each page that begins a section you want linked in your table of contents.
Step 11b: Hyperlinks
On your Table of Contents page, highlight each entry. Go up to "insert" then select "hyperlink."

Make sure "Document" is selected in the left part of the window that pops up, then click on the target button to the right of the Target box.

A window will appear to the right. Expand the "bookmarks" section.

You should see the list of all bookmarks you created. If you don't, or if you see duplicate links, you'll have to go back into the bookmarks box and delete/add as necessary.
Click on the bookmark that matches what you're trying to link to (in this case "summary"), click "apply" and then click "close" in the small window to the right. When you're done, the main hyperlink window should look like this:

Do this for each item on your table of contents. Go slow, take your time. When you're done, your ToC should look like this:

And this is a good time to test those links.
When you were creating bookmarks, you should have created one for the table of contents page. (Two images up, you'll see a "toc" link in my bookmarks list.) Now, while you're testing those links, highlight something on each page (on my Summary page, I use the story title; on all other pages, I use the page title heading) and create a hyperlink back to the Table of Contents.
All right. You should be ready to upload to Smashwords now. Before you do, check over your file one last time. Is it saved in a .doc format? Is the main body consistently formatted? Do all of your links work?
Does it make you proud?
Good luck!
Today, we're going to create our "extra" pages (the summary, the table of contents, acknowledgements, about the author, and also by) and then create a linked table of contents. As always, I strongly suggest consulting the Smashwords Style Guide by Mark Coker and using this guide only as a program-specific supplement. Click on any photo to enlarge.
Step 10: Extras
Step 10a: Summary
In all of my books, I've included a summary first thing. I got the idea from someone on Twitter who lamented that she'd download free books and then forget what they're about when she got around to reading them. Not remembering what they were about meant she was less likely to read them. So I include a sort of "inside front flap" summary. You don't have to. If you choose not to, just skip this step.
In front of your copyright page, type up your summary, then do three carriage returns (no more).

Step 10b: Insert Manual Break
A manual page break won't affect the HTML or TXT files Smashwords creates, and it may not work on some devices, but I've always had excellent luck with this making the book look exactly as I want it to look. Even if the file doesn't break for a new page, the three carriage returns create space to separate the summary from the copyright page.

Step 10c: Table of Contents Page
After the summary page, you should have your title page and then your copyright page. For each of those, do the same thing: three carriage returns, insert page break. By this point, you should be on a fourth blank page. Here's where you create your table of contents. Give it a title (use the same style you used for your title page) and then add the contents list in default style. It should look something like this:

Step 10d: Acknowledgments, About the Author, Also by
These are all entirely optional pages, just as the Summary page is. If you'd like to keep your book super simple, just lead with the title and copyright pages, create a ToC that has only the story, and leave it at that. If, however, you'd like to give your thanks to those who helped you along, or your readers a chance to learn a bit about you and discover more, then this is the way to go. Marketing guides will tell you to add your website address (the full address; you can even try linking it, but I don't recommend it) and maybe even a sample of something else available for purchase.
At the end of your story, do the same as before: three carriage returns and insert manual break. This will be your acknowledgements page (or your About the Author, or Also by, or whatever it is.) Whatever you decide to do, be consistent in your formatting. If you have complete paragraphs, format the paragraphs with first line indent. If you're creating a list (of titles, for example) then leave them left-justified. Make sure you use the same header style as the other title headings in your book. This is what my "extra" pages look like:


Note that my web address is unlinked. I try to keep my hyperlinks within the book because I feel like it can get messy if you add too many.

After this is where you'd add the sample of your other available writing. You can also add more or less to this page as you desire. In one of my books, I added summaries of each story.
Step 11: Creating a Linked Table of Contents
There are several reasons to create a linked table of contents yourself. The Smashwords program won't do it for you and your book will get rejected from the premium catalog, you want to control where your readers can go easily, you want to organize your book. You really want to do this and it's really easy once you figure it out.
Step 11a: Bookmarks
First you want to create the bookmarks. These should match up with the list you already typed up on your Table of Contents page. Go to the beginning of each page, click your cursor to in front of the first letter on the page, go up to "insert" and select "bookmark."

Give your bookmark a concise, clear name.

Do this for each page that begins a section you want linked in your table of contents.
Step 11b: Hyperlinks
On your Table of Contents page, highlight each entry. Go up to "insert" then select "hyperlink."

Make sure "Document" is selected in the left part of the window that pops up, then click on the target button to the right of the Target box.

A window will appear to the right. Expand the "bookmarks" section.

You should see the list of all bookmarks you created. If you don't, or if you see duplicate links, you'll have to go back into the bookmarks box and delete/add as necessary.
Click on the bookmark that matches what you're trying to link to (in this case "summary"), click "apply" and then click "close" in the small window to the right. When you're done, the main hyperlink window should look like this:

Do this for each item on your table of contents. Go slow, take your time. When you're done, your ToC should look like this:

And this is a good time to test those links.
When you were creating bookmarks, you should have created one for the table of contents page. (Two images up, you'll see a "toc" link in my bookmarks list.) Now, while you're testing those links, highlight something on each page (on my Summary page, I use the story title; on all other pages, I use the page title heading) and create a hyperlink back to the Table of Contents.
All right. You should be ready to upload to Smashwords now. Before you do, check over your file one last time. Is it saved in a .doc format? Is the main body consistently formatted? Do all of your links work?
Does it make you proud?
Good luck!
Wednesday, May 9, 2012
Self-Publishing: Basic Fiction Formatting for Smashwords in OpenOffice (Part 3: Steps 8 - 9)
Part 1 (steps 1 - 4) of this series is here and Part 2 (steps 5 - 7) is here. Today, we're going to create and format the copyright and title pages. Click on any image below to enlarge it.
Step 8: Copyright Page
Step 8a: Highlight your text, select "more..." from the formatting menu, right-click "default" and select "new..."
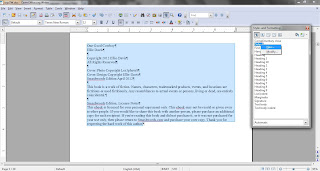
Step 8b: Name the new style.

Step 8c: Set indents and spacing to 0.00"

Step 8d: Center text.

Step 8e: Select font, typeface, and size
Don't get fancy. Stick with Times New Roman in Regular and 12pt.

This is what it should look like when you're done:

For some reason, my copyright page formatting doesn't always show up the way it should in all formats. I haven't quite figured out why that is. When it is successful, these are the steps I take. It's just the copyright page and it doesn't turn out as an eyesore (usually it just comes out left-justified, which isn't the end of the world) so I don't worry about it, but it can be vexing. I just wanted to warn you.
Step 9: Title Page
These steps are pretty much the same as for the copyright page. The only main difference is the change in text size, and that is an entirely personal decision. I go with 14pt font.


Too easy? Maybe. But I'm giving you a break. Next time, we're going to create the "extra" book pages and a linked table of contents.
Step 8: Copyright Page
Before I start showing you the pictures, here's the text you're going to need for your copyright page. Now, the Style Guide doesn't give you the disclaimer. It doesn't even require the License Notes, or cover photo/design credit, but I add all of these things because I think it just looks professional. It's up to you. Verify with the Style Guide what the requirements are. Feel free to copy and paste the text below and replace the placeholders with your information.
Title
by Author
Copyright 2011 Author
All Rights Reserved
Cover Photo by Photographer
Cover Design by Designer
Smashwords Edition Month Year
This book is a work of fiction. Names,
characters, trademarked products, events, and locations are
fictitious or are used fictitiously. Any
resemblances to actual events or persons, living or dead, are
entirely coincidental.
Smashwords Edition License Notes
This ebook is licensed for your personal
enjoyment only. This ebook may not be re-sold
or given away to other people. If you
would like to share this book with another person,
please purchase an additional copy for
each recipient. If you’re reading this book and did
not purchase it, or it was not purchased
for your use only, then please return to
Smashwords.com and purchase your own
copy. Thank you for respecting the hard work
of
this author.
Step 8a: Highlight your text, select "more..." from the formatting menu, right-click "default" and select "new..."

Step 8b: Name the new style.

Step 8c: Set indents and spacing to 0.00"
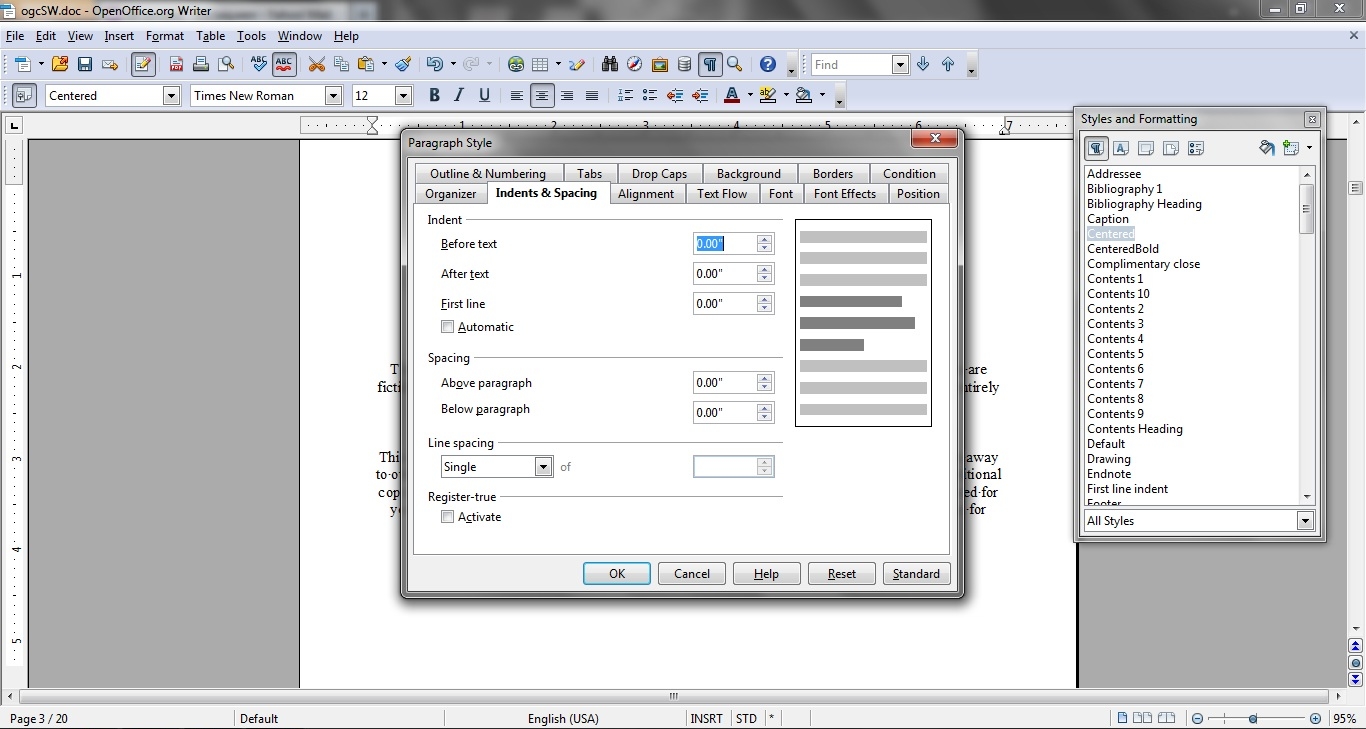
Step 8d: Center text.

Step 8e: Select font, typeface, and size
Don't get fancy. Stick with Times New Roman in Regular and 12pt.

This is what it should look like when you're done:

For some reason, my copyright page formatting doesn't always show up the way it should in all formats. I haven't quite figured out why that is. When it is successful, these are the steps I take. It's just the copyright page and it doesn't turn out as an eyesore (usually it just comes out left-justified, which isn't the end of the world) so I don't worry about it, but it can be vexing. I just wanted to warn you.
Step 9: Title Page
These steps are pretty much the same as for the copyright page. The only main difference is the change in text size, and that is an entirely personal decision. I go with 14pt font.


Too easy? Maybe. But I'm giving you a break. Next time, we're going to create the "extra" book pages and a linked table of contents.
Wednesday, May 2, 2012
Self-Publishing: Basic Fiction Formatting for Smashwords in OpenOffice (Part 2: Steps 5 - 7)
In this post last week, I showed you how to get your OpenOffice text document ready for formatting. It has just now occurred to me one crucial detail I forgot to mention: When you save your file, use file extension .doc because that's the only extension Smashwords will accept.

Sorry about that. After I started formatting for Smashwords regularly, I just saved all of my text documents with the Word extension. I completely forgot that this guide is for those of you who aren't doing this regularly just yet.
Anyway, moving on. Today we're going to learn how to choose our paragraph separation method and then apply that to the text body.
You have two choices for separating your paragraphs: first line indent and block paragraph. Pick one.
In the Smashwords Style Guide, Mark Coker explains that his guide is formatted using the block paragraph method (paragraphs look like blog post paragraphs) which is "common for some non-fiction." If you're formatting a non-fiction work, especially if it has photos, and you're using block paragraph... these aren't the posts you're looking for. I've never tried formatting with block paragraphs and all of my attempts at including photos in my books haven't exactly been successful. As soon as I figure it out, expect to see a post or more on the subject. Until then, I refer you back to the Smashwords Style Guide and suggest you implement the spirit of the instructions.
First line indent is the type of paragraph separation you're probably most familiar with. Pick up any fiction book nearby and you'll see paragraphs arranged on the page without any spaces between them, just a little indent at the beginning of the first line. In school, you were probably taught to create that indent with a tab. No. Tabs are bad. Very, very bad. If you have them in your document, get rid of them now. Go ahead. I'll wait.
All done? Good. Let's get started. As before, click on any image below to enlarge.
Step 5: Default Formatting
Ctrl + A to select your text and then select "default" from the list of formatting options. This is going to normalize your text and make it easier for you to format without any surprises popping up.

This is what your default indents and spacing options should look like:

And this is what your default text options should look like:

Don't get fancy with your font choices. Stick with Times New Roman. Not only because it looks the most professional, but because the default choice will be easier for the different electronic readers to display and to convert when the e-reader has been hacked to the owner's preferences.
Step 6: Applying and Formatting First Line Indent
If you've never formatted paragraphs before, this step might be a bit cumbersome.
Step 6a: Select "More..." from the formatting menu

Step 6b: Select "first line indent" and left click; select "modify"


Step 6c: Verify indent measurements
Everything but first line should be 0. First line should be no more than 0.25" because of the different sizes of ereader screens. I like the 0.20" default setting. It looks nice and translates well to every reader I've used.

Step 6d: Verify spacing measurements
For some reason, my copy of OpenOffice defaults to 0.08" below paragraph. I haven't figured out how to change the default permanently yet, so I go in each time I use this paragraph style to change it. If you know how to make the settings permanent, please share!

It should be 0 like everything else.

Step 7: Click "OK"
Ta-da! Your paragraphs should look like this:

Next post: creating and formatting the copyright and title pages.

Sorry about that. After I started formatting for Smashwords regularly, I just saved all of my text documents with the Word extension. I completely forgot that this guide is for those of you who aren't doing this regularly just yet.
Anyway, moving on. Today we're going to learn how to choose our paragraph separation method and then apply that to the text body.
You have two choices for separating your paragraphs: first line indent and block paragraph. Pick one.
In the Smashwords Style Guide, Mark Coker explains that his guide is formatted using the block paragraph method (paragraphs look like blog post paragraphs) which is "common for some non-fiction." If you're formatting a non-fiction work, especially if it has photos, and you're using block paragraph... these aren't the posts you're looking for. I've never tried formatting with block paragraphs and all of my attempts at including photos in my books haven't exactly been successful. As soon as I figure it out, expect to see a post or more on the subject. Until then, I refer you back to the Smashwords Style Guide and suggest you implement the spirit of the instructions.
First line indent is the type of paragraph separation you're probably most familiar with. Pick up any fiction book nearby and you'll see paragraphs arranged on the page without any spaces between them, just a little indent at the beginning of the first line. In school, you were probably taught to create that indent with a tab. No. Tabs are bad. Very, very bad. If you have them in your document, get rid of them now. Go ahead. I'll wait.
All done? Good. Let's get started. As before, click on any image below to enlarge.
Step 5: Default Formatting
Ctrl + A to select your text and then select "default" from the list of formatting options. This is going to normalize your text and make it easier for you to format without any surprises popping up.

This is what your default indents and spacing options should look like:

And this is what your default text options should look like:

Don't get fancy with your font choices. Stick with Times New Roman. Not only because it looks the most professional, but because the default choice will be easier for the different electronic readers to display and to convert when the e-reader has been hacked to the owner's preferences.
Step 6: Applying and Formatting First Line Indent
If you've never formatted paragraphs before, this step might be a bit cumbersome.
Step 6a: Select "More..." from the formatting menu

Step 6b: Select "first line indent" and left click; select "modify"


Step 6c: Verify indent measurements
Everything but first line should be 0. First line should be no more than 0.25" because of the different sizes of ereader screens. I like the 0.20" default setting. It looks nice and translates well to every reader I've used.

Step 6d: Verify spacing measurements
For some reason, my copy of OpenOffice defaults to 0.08" below paragraph. I haven't figured out how to change the default permanently yet, so I go in each time I use this paragraph style to change it. If you know how to make the settings permanent, please share!

It should be 0 like everything else.

Step 7: Click "OK"
Ta-da! Your paragraphs should look like this:

Next post: creating and formatting the copyright and title pages.
Wednesday, April 25, 2012
Self-Publishing: Basic Fiction Formatting for Smashwords in Open Office (Part 1: Steps 1 - 4)
OpenOffice is my word processing software of choice. Aside from the fact that it's free, it has basically all the same capabilities as MS Word. There is definitely a learning curve, but if you've mastered Word, you shouldn't have any problem at all with OpenOffice. And if you're reading this, chances are you feel pretty proficient and are ready to format your manuscript.
First of all, download a copy of the Smashwords Style Guide. Read it. You don't have to fully understand it, but Coker explains a lot about Smashwords and formatting expectations. If you feel like you can format in OpenOffice by implementing the spirit of the guide, go for it. That's what I did. It took some trial and error, but I think my books are pretty predictably and attractively formatted. (At least, they are in my Kindle and on my computer. I haven't gotten any complaints, either, and I've only had one book rejected once from the Premium Catalog. I messed up the table of contents.)
Disclaimer: my formatting guide is based entirely on the Smashwords Style Guide by Mark Coker. I'm even copying the order in which the steps appear. My intention is not to profit from this guide. My intention is to provide information and help to fellow self-published writers. Click any image below to enlarge.
Step 1: Make A Backup
You've done this already, right? I'm sure you have. But I'll just put this here, you know, in case.

Step 2: View Nonprinting Characters
When you can see all the little things the word processor adds to your file, you can more easily clean them up. This makes for a sleek, attractive-looking reading page.

Step 3: Turn off AutoCorrectThis is important. AutoCorrect options embed weird symbols and code into your file and you don't want that. Personally, I clear out all AutoCorrect options. (You can leave spellcheck on.) I don't like the risk of even one overlooked formatting error. Formatting errors, just like spelling and grammar errors, jar the reader from the story.
Step 3a: Select Tools > AutoCorrect Options

Step 3b: Empty "Replace" tab
This is time-consuming, but (to me, at least) worth it.

Step 3c: Unselect all boxes in "Options" tab

Step 3d: Disable and empty "Word Completion" tab

It should be noted here that the Smashwords Style Guide advises eliminating text boxes. I don't use text boxes, I've never even tried, so I don't even know where to begin. If you have text boxes in your manuscript, consult the Style Guide.
Step 4: Clean Up With The Nuclear Method
"The Nuclear Method" is what Coker has dubbed this step and I like the name, so I'm using it here. You can skip this step, but I really wouldn't recommend it. Later on down the line when you have that one little mistake keeping your EPUB file from being perfect, you'll probably have to do this. Go ahead and do it now.
Step 4a: Copy text

Step 4b: Open Notepad

Step 4c: Paste text into Notepad

Step 4d: Close out of OpenOffice

Step 4e: Open new text file

Step 4f: Copy from Notepad

Step 4g: Paste into OpenOffice

Step 4h: Save your document

In the next post, we'll look at choosing a paragraph separation method and formatting those paragraphs.
Subscribe to:
Posts (Atom)